Activate Gravity Forms Plugin
To activate the plugin, go to the Plugins area of your Administrator Dashboard, find “Gravity Forms” and then click on the “Activate” link. Once activated, a “Forms” link will appear in the left, black Administrator menu. Move the mouse cursor over “Forms” to expose the context menu for the plugin. You can either click on the main “Forms” link or you can click on “New Form” link in the context menu.

Creating a form
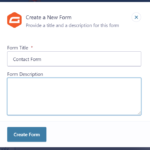
Give the new form a title and then click on the “Create Form” button.
On the creation screen, you can either click on a field or drag and drop it in order to add a new field.

To add a CAPTCHA field and or a Consent field, you would need to look in the Advanced Fields section:

Obtaining reCAPTCHA keys
If you do add a CAPTCHA field, you will need to add a Public Key and a Private Key for your Google reCAPTCHA. You can try using the Honeypot option (on top of the automatic Akismet integration) and see if that is sufficient for preventing Spam submissions. If it is not, then you can proceed with the reCAPTCHA field option.
To edit the field settings, move the mouse cursor over the field and then click on the Settings icon.
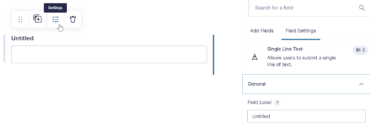
From here, you can make a field required, change field size and use conditional logic, etc.
To save your form, click on the blue “Update” button at the top right corner.
Once your form has been updated, then it is time to add email confirmations (page confirmation) and notifications (email notifications). To add either one, move the mouse cursor over the Settings menu at the top of your form.
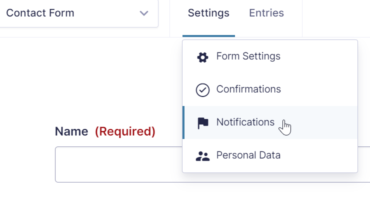
In the Notifications section, you can add email notifications to go out to you and or to the submitter. Move the mouse cursor over the “Admin Notification” link, click edit and then change {admin_email} to your email address. By default, {admin_email} uses the “Administration Email Address” field value at Administrator dashboard -> Settings -> General Settings.
Enabling Honeypot
By default, Honeypot is not enabled. To enable it, go to the Form Setings section and enable the “Anti-spam honeypot” option at the bottom in the “Form Options” section.
By default, your form stores submissions indefinitely. I highly recommend that you go to the “Personal Data” area under the form’s settings and “Trash entries automatically” after 30 days or less. This will help reduce storage consumption.

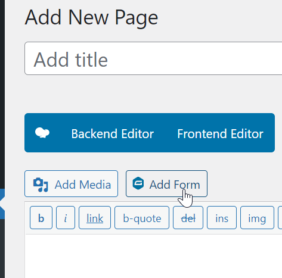
Adding a form to a Page/Post
After saving your form, you can edit your Page or Post and click on the Gravity Form icon to add your form to it. Be sure to test your form before going live 🙂 . The screenshot below is based on the Classic Editor, a plugin that you can activate in the Plugins area of the Administrator Dashboard.